Archive for the ‘Cooking’ Category

Tiramisu without coffee

Tuesday, 27 August, 2013

For years and years and years I have wanted to try tiramisu, because it always looks so good when I see it in restaurants and cafes. But I do not have caffeine, and from what I remember of coffee flavoured things when I was a child, I really hate the flavour of coffee too – so I have never tried tiramisu.

I mentioned this to my wife the other day, when we were in a restaurant and I saw on the menu: orange “tiramisu”. I figured the quotes around “tiramisu” were to indicate that this was a tiramisu-inspired dessert, made with orange flavours, and so probably without coffee. I thought this would be awesome, because I might finally get to taste tiramisu for the first time. Being extra careful, I asked the waiter if the “tiramisu” dessert had any coffee in it. Alas, she replied that it did in fact contain coffee. So I didn’t order it.

Undaunted, my wife decided to find a recipe for tiramisu without coffee, and to make it for me. Here’s a simple one we found, and a more complex one. We’ll try the simple one first and see what I think of it.

Duck confit

Wednesday, 12 January, 2011

I recently bought the book Cooking for Geeks. It’s very cool, and it approaches cooking the way I like to approach things, by understanding how it works. Rather than give you a recipe and you just follow it blindly and hope for the best, it explains that at this temperature this particular protein denatures, which makes meat taste good, and at that temperature some other protein denatures, which makes meat tough and stringy, so the secret to a good steak is to warm the inside to a temperature between the two.

Another thing it tells you is the temperature at which collagen – the tough gristly connective gunk between the meat – denatures into gelatin. This reaction takes a long time, so the way to get a tough piece of meat to be nice is to cook it at a specific temperature for several hours. This explains why cheap cuts of meat should be stewed over a low heat for hours. After explaining this, it gives a recipe which demonstrates the principle: duck confit. This sounds fancy and scary, but the procedure is pretty simple*.

So on Sunday I bought a couple of duck legs from a local gourmet butcher, prepared them, and whacked them in the over for 6 hours. It was 10pm by the time they came out, so I cooled them down and stuck them in the fridge. Tonight for dinner, I took one of the legs out and seared the skin side in a really hot frying pan with some butter, while I boiled up some simple pasta spirals. I tried to be fancy and make a sauce out of the leftover fat in the pan once I removed the duck leg, but it didn’t turn out (I need more practice at that), so I dumped it and just had the duck leg with the pasta.

Oh. My. God.

I had no idea I could cook anything that delicious. The duck, deprived of its connective collagen, simply fell off the bone. It was moist and tender and slightly salty and lip-smackingly tasty. And the seared skin was crispy and provided a nice contrast to the soft meat.

Next time we have people over for dinner, or I have to cook something for the guys for a gaming day or something, I am going to make this. I want people to fawn over me as the creator of this sensual, delectable delight. And I have another leg still in the fridge… oooh, yum.

* Duck Confit

Get some duck legs. Pat dry, then rub salt into them, covering every surface (about a tablespoon of salt per leg). Option: add garlic and/or herbs. Sit in covered bowl in fridge for a couple of hours. Wash thoroughly and pat dry. Arrange in an oven dish and cover with olive oil – the duck has to be completely submerged. Bake at 80°C for six hours. (Yes, 80, not 180. Below the boiling point of water.) Remove from oil and either store in a sealed container in the fridge for up to a week to use later, or sear the skin crispy in a frying pan and serve. (And save the oil – it now has duck fat mixed through it. Use it to fry potatoes, or eggs, or meats.)

Cooking Types

Saturday, 2 October, 2010

I’ve started reading the copy of Cooking for Geeks I ordered from Amazon. It includes a bunch of interviews with various foodies and food-oriented geeks. The first is with one Brian Wansink, a professor at Cornell University who studies people’s interactions with food.

He says at least 80% of cooks can be described in one of these five categories:

  • Giving cooks: See food as an extension of love. They tend to make great bakers, stick to trusted traditional recipes, and everyone loves their home-style cooking.
  • Healthy cooks: Cook because eating pre-prepared food isn’t as healthy. Tend to use lots of fresh produce and seafood, may have their own vegetable garden.
  • Methodical cooks: Can cook anything, but will do so with a recipe in front of them the whole time. And when they’re finished, the result will look exactly like it does in the cookbook.
  • Innovative cooks: Cook by intuition. If they use a cookbook at all, it’s merely to glance at the picture, say, “I can do that,” and then go try doing it. It may not turn out right, but that’s okay, they just go, “No biggie, I’ll do it differently next time.”
  • Competitive cooks: Cook to impress. Try weird stuff in an effort to make people go, “Wow! I’ve never had anything like that before.”

As much as I dislike pigeonholing, this breakdown (and the fact that Wansink says only about 80% of cooks fall neatly into one of the categories) sounds pretty close to my experience with the cooking of myself and other people. My wife is the methodical sort. I’m always exhorting her not to bother measuring stuff – just chuck in as much as looks right – but she insists on carefully using the measuring cups and scales that I never bother with.

Interestingly, I pegged myself as an innovative type, but when I read the categories out to her she immediately said the competitive category fit me perfectly. Hmmm.

Kitchen gadgets

Monday, 7 June, 2010

I decided for no apparent reason to make a list of our kitchen gadgets, and how often we use them. Begin pointless infodump!

Electric gadgets:

  • Blender – We made smoothies and stuff with this for about a year after we got it, but that ended suddenly. Has been used maybe once or twice in the past couple of years.
  • Food processor – Used once a week or so for things like pureeing pumpkin or potato for soup, chopping nuts, pureeing fruit, etc.
  • Microwave oven – Used a few times a week, mainly to reheat food, but also sometimes to melt butter, or cook vegetables like cauliflower or broccoli.
  • Electric wok – We used to use this a lot for stir fries, but it’s large and stored inconveniently so we’ve moved away from it. Gets pulled out maybe once a month or two.
  • Ice cream maker – Used to make a batch of ice cream every few weeks. We’ve got a lot of use out of this!
  • Electric hand mixer – Used frequently for beating ice cream mixture (see above), cake batters, pancakes, whipping cream, etc.
  • Sandwich press – Used two or three times a week for hot sandwiches, mostly on weekends.
  • Toaster – Used nearly every day to make toast.
  • Electric kettle – Used daily to make tea and coffee.
  • Electric scales – Battery operated. Used to measure ingredients when baking cakes and stuff.

Non-electric gadgets:

  • Garlic press – Used this a couple of times, years ago. It’s impossibly fiddly to clean, so we gave up using it.
  • Apple corer – I use this occasionally to core apples or pears for baking.
  • Tea balls – Used regularly for loose leaf tea.
  • Citrus reamer – Used occasionally for extracting lemon juice.
  • Wine bottle pump – Used a few times a month to keep half-drunk bottles of wine sealed and oxygen-free.
  • Bamboo steamer – Used a few times a year to steam Chinese dumplings.
  • Pizza pan – Used frequently to bake pizzas.
  • Various cake and muffin tins – Used a couple of times a month for baking.
  • Cooling racks – As above.
  • Potato masher – Not used much; we never have mashed potatoes. Occasionally used to mash pumpkin for soup.
  • Egg rings – Occasional use for making neat fried eggs to put on hamburgers.
  • Wooden trivets – A few times a year for presenting hot food dishes on the dining table when guests are over.
  • Hotplate heat dispersers – Used frequently to avoid the gas flame from over-heating saucepans.
  • Cookie cutters – Never used as far as I can remember.
  • Corkscrew – Used on wine corks, which is only about 20% of the bottles these days.
  • Corn holders – Used when we have corn on the cob, a few times a year.
  • Pastry brush – Used rarely, it’s so evil to clean that I hate using it.
  • Chopsticks – Never use these at home.
  • Meat tenderiser – Used maybe once, ever.
  • Teapot – Almost never used; we usually make tea one cup at a time.
  • Coffee percolator – Used once or twice years ago; I don’t drink coffee and M. prefers instant to percolated.

The usual suspects, used fairly frequently:
Cutting knives, eating knives, spoons, forks, wooden spoons, serving spoons, slotted spoons, tongs, vegetable peeler, can opener, oven mitts, colander, spatulas, egg-flips, cheese grater, ice cream scoop, cheese knife, various pots and pans, cutting boards, casserole dishes, pie dishes.

Some more-or-less common gadgets we don’t have:
Rolling pin, mortar & pestle, bread maker, rice cooker, lemon zester, deep fryer, egg cups, blow torch, pressure cooker.

Not listed:
Crockery and glassware – that’s a whole ‘nother post (except it would be even more boring).

Cheesecakery

Sunday, 6 June, 2010

Orange-lime cheesecake
So I decided to make a cheesecake, of the chilled, non-baked variety. I’ve never made one before, but I saw a great looking cheesecake recipe book while browsing around in Borders the other week. I was tempted to buy it at the time, but decided against. And then a week later we received some Borders book club coupons, one of which was 40% off a cookbook! So it was duly acquired.

The book is split half-half between baked cheesecakes (my favourite type), and non-baked. I thought I’d start by trying a classic non-baked cheesecake, before moving on to some of the more exotic types in the book.

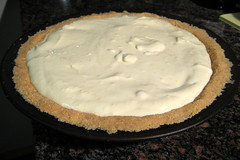
Being my first time, I tried to follow the recipe as closely as I could. After making a reasonably successful biscuit-crumb base, I turned to the filling. The recipe said to start by dissolving a teaspoon of gelatine in a tablespoon of water, by using a heatproof cup in a saucepan of simmering water to heat it gently. That worked fine. The recipe said to set it aside for 5 minutes to cool, while mixing the rest of the filling.

Fine… I got the rest of the filling mixed up. Cream cheese, sweetened condensed milk, some orange zest, lime juice. It looked fine and tasted right. Then it was time to add the dissolved gelatine. Only the cup which had the gelatine and water in it now held a solid, rubbery plug of jelly. It was no longer liquid at all! I tried mixing it through the filling mixture, but it was like trying to mix a lump of rubber through it. I had to fish it out and make an entirely new batch of dissolved gelatine. This time I mixed it into the filling before it had a chance to cool down and solidify. Hopefully it will turn out okay and the filling will set properly.